Have you noticed that when you try to use some of those free SMS online services, half the time they don’t work? Well, most of them never worked for me when all I tried to do was send a text message from my computer at home to my Verizon cell phone! Not only that, but some of them start to spam the phone number with text message ads.
So in this article, I will mention the free SMS texting sites last, as you really should avoid using them unless you have no other option. Luckily, there are some legitimate ways to send a text message from your computer without having to use shady websites who might sell your data and spam you.
Send SMS via Carrier Websites
A lot of the wireless carriers let you send text messages directly from their websites. The big caveat to this method is that you can normally only send text message via their website to other people using the same carrier. For example, if you are an AT&T customer, you will only be able to send text messages to other AT&T customers via the website.
Here are a couple of links that walk you through the process of sending a text message via the carrier’s website:
If you can’t figure out where to send a text message on your carrier website, just Google send SMS viacarriername website and you’ll find the answer. If you need to send an SMS to someone not on the same network, then continue reading.
Send Emails to Phone Numbers
Another feature that most carriers have that a lot of people don’t know about is an email address that is associated to your phone number. You can send an email to this special email address and that phone number will receive a text message.
The format is basically the nine digit number @ whatever domain the carrier has chosen. Here are all the ones I could find online:
AT&T – @txt.att.net (SMS), @mms.att.net (MMS)
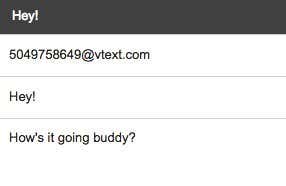
Verizon – @vtext.com (SMS), @vzwpix.com (MMS)
T-mobile – @tmomail.net
Sprint – @messaging.sprintpcs.com
Alltel: @message.alltel.com
Boost Mobile – @myboostmobile.com
Cricket – @sms.mycricket.com, @mms.mycricket.com
Metro PCS – @mymetropcs.com
Nextel: @messaging.nextel.com
SunCom: @tms.suncom.com
US Cellular – @email.uscc.net
VoiceStream: @voicestream.net
Google Voice via Google Hangouts
The other service I use for sending SMS messages from my computer is Google Voice and Google Hangouts. Google Voice will let you send text messages directly from the Google Voice service once you sign up for a number, but you can also integrate Google Voice into Google Hangouts so that you can send SMS messages where you use Google Hangouts, i.e. Gmail, iPhone app, etc.
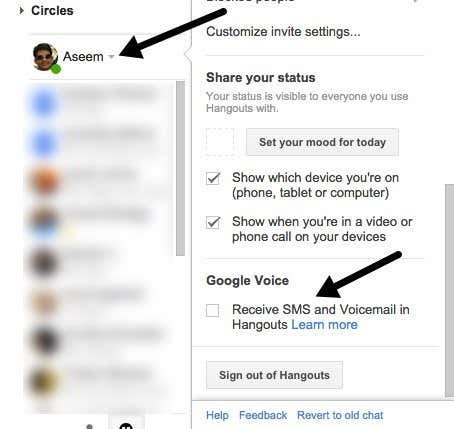
To set it up, you first have to make sure you have a Google Voice account. Make sure you sign up using the same email address you use for your Gmail account. Once you have it setup with a number, go to Gmail and click on your name in the chat window that on the left hand side. If you have chat disabled, you need to go to Settings – Chat and turn the chat back on.
Once you check that box, all your SMS messages will go through Google Hangouts rather than thru Google Voice. Since Google seems to be moving everything over to Hangouts now, I would suggest you set it up this way. Now go ahead and restart Chrome and log back into your Gmail account. Search for a contact by clicking on the little magnifying glass icon next to your name in the chat section and make sure the number is a US phone number. As of now, you can only send SMS messages to US numbers.
You’ll notice a new icon with the letters SMS written on it at the top when the chat window opens. Click on that and it will open a new windows to the left and the text box says Send an SMS message. You can send text messages to any phone number as long as it’s a phone number in the US or Canada.
MightyText for Android
If you have an Android phone, then you have another option available to your for sending text messages from your computer. The way it works is that you install the MightyText app on your Android phone, which will then link your phone number to your Google account. You then log into the MightyText website on your computer and it will sync all the text messages from your phone.
When you send a message from the web interface, it gets sent back down to your phone and then app will send out the message like a normal text message. When you get a reply, the app will forward it to the web interface. From the reviews, it seems to work very well, so if you’re an Android user, it’s a great option.
Use a SMS Website
As I mentioned above, SMS sites are the last resort. I have tried a bunch and have tried to only list the ones that actually worked for me.
1. txt2day.com – Easy as heck to use, simply enter you 10 digit number, email (optional), your provider, and the text message. The reason this service is one of my favorite is for two reasons: first, if you’re sending a message to someone and you don’t know their wireless provider, you can lookup the provider based on the phone number and secondly, if someone starts to spam you using the service, you can have your number blocked so you don’t get any messages from that number.
3. SMS Everywhere (http://smseverywhere.com/) – This is by far the simplest of all the text message sending services. All you have to fill out is the number and a message! The cool thing about this service, which is an advantage over the other two, is that you don’t have to know the provider at all, it figures it out for you! That’s pretty great in my book! Simply put in the number, type your message and you’re done!
4. Text’em (http://www.textem.net/) - This service has no clear advantage over the other services and actually requires more steps, i.e. provider, email address, security code, etc, but at least it works!
All of these services are for the United States only, meaning you can only send text messages to US cell phones. Of course, you can only SEND for free, the person who receives them will be charged for incoming text messages depending on their plan.
So if you’re looking for a quick and easy way to send free SMS text messages from your PC to cell phones, hopefully this article helped. If you have any questions, feel free to post a comment. Enjoy
I’m a massive fan of building stuff from the ground up. There are loads of plugins around for everything you could ever wish for in a WordPress blog, but I feel both rewarded and secure when I build features from scratch.
Why bother? Most of the time I don’t want to mess around with a plugin’s UI, or the plugin does way more than I actually want it to do. Without hacking the core files, plugins can be very rigid with what you’re allowed to do.
The solution? Roll your own! It’s a great learning experience, you know what’s going on under the hood and you’re gaining skills for another time. And trust me, you will need these skills down the track. I’ve rarely learnt how to do something with WordPress that I haven’t ended up repeating in another project.
Why Don’t I Just Use a Plugin?
Here are four good reasons why plugins are bad for simple contact forms:
Plugins pack in way more than you (should) care for
Using a UI to build a simple contact form is overkill
Knowing what’s under the hood is good for your knowledge, and your peace of mind
Default stylesheets kill me slowly from the inside
I could probably go on.
I hate bulky UIs with a passion. I hate bad UX and I especially hate too much functionality. Hate is a very strong word, but these days most forms that boast contact forms are in competition with each other to create the best, most feature rich plugin. And it ends up looking like this
How many times have you gone to fill out a form, only to be daunted by the amount of personal data you have to put in? It happens all the time. People even get halfway and are then distracted by something else. People on the web have a very short attention span. So in order for you to make it as easy as possible for your potential clients and customers to get in touch with you, you really should be stripping to the bone.
So What’s Absolutely Essential?
Name, email, message and human verification. But I think you knew that already.
These four small bits of information are as simple as commenting on a blog — why would you want to make getting in touch any more difficult? I don’t think I’ve ever built a form with more information than that, unless absolutely required.
If people want to leave their phone number and address, they will do so in the message. Visual cues such as asking them in a short paragraph above the form is enough!
Surely It’s a Pain Coding Everything From scratch!?
Not really. I mean, if you’re patient you’ll smash through this tutorial in under half an hour. All it really consists of is:
A custom template file
Some PHP
Yep, that’s it. You can handle displaying the form, human verification, validation, emailing the admin and thanking the reader for getting in touch all in one file. In fact, here it is.
To follow good practice, I’m going to create a child theme of TwentyTwelve — available here — with just a stylesheet and our custom page template. You can take out the custom page template and drop it into any of your current themes, and it should work flawlessly (bar some CSS modifications).
In wp-content/themes, add a new folder called “contact-form.” Within that, create two new files — style.css and page-contact-us.php.
Inside style.css, paste the following:
/*
Theme Name:     Contact Form Page Template
Theme URI:      http://premium.wpmudev.org/blog/
Description:    A super simple, self-contained contact form you can drop into your existing theme.
Author:         Harley
Author URI:     http://premium.wpmudev.org/
Template:       twentytwelve
Version:        0.1
*/

@import url("../twentytwelve/style.css");
Ignore my shameless premium plug — I work here. It’s a requirement!
By now, you should be able to go ahead and activate the theme on your test site, and be ready to roll.
The next step is to create a page, aptly-named “Contact Us.” This name is special. It relates immediately to the template file we made previously called page-contact-us.php. This solution for creating a custom page template is not a catch-all, just a convention WordPress provides and I like. Page-about-us.php would automatically be used to display a page titled “About Us.” It’s kinda handy!
If you’ve created page-contact-us.php and left it empty, visiting your newly created “Contact Us” page will yield a blank page.
That’s alright though! Quickly pad it out with the following, and it will look just like a normal page again.
Excuse the inline style! This is purely for error/success messages, and to put the whole thing in one file. Feel free to put it in your style.css.
There are a number of things going on here. Firstly, we echo the $respond variable, which we’ll look at a bit later.
The rest is just form tags, but you’ll note that the value of them echoes a $_POST variable. This is so that in the case the form is submitted incorrectly, all data is retained so the user doesn’t have to type out everything from scratch.
There’s also a sneaky “hidden” form input, that allows us to check if a user has posted anything or not. I’ll get to that later though.
I’ve added an asterix next to each input, to signify they are required.
If you save that and refresh, you’ll have a nice looking contact form!
The logic
The logic that follows upon form submission is simple. There are several components that need to be built.
Response generation and messages (based on validation)
Validation
Sending an email
Response Generation
To save having messy PHP code, we’ve placed the $response variable within the form. That’s cool, keeping logic mostly separate from views. How do we set this though?
It’s pretty easy really, we need to write a function that fills the $response variable with the feedback we get from validation. This must contain messages to address each validation requirement.
At the top of your page-contact-us.php before get_header(), paste the following.
<?php

  //response generation function
  $response = "";

  //function to generate response
  function my_contact_form_generate_response($type, $message){

    global $response;

    if($type == "success") $response = "<div class='success'>{$message}</div>";
    else $response = "<div class='error'>{$message}</div>";

  }
?>
Cool. This doesn’t do a whole lot yet, but if you have basic PHP knowledge you’ll understand that we a) create an empty $response variable, and b) fill it with the $message passed depending on its $type, which will either be error or success.
Now when we build the validation, we can call generate_response() at each case (whether it be a success or failure), pass a message (i.e. Email address invalid), and it will be spat out right above the form!
A few variables to get us going
There are 3 groups of variables we need for a successful contact form.
Validation Messages
Form Input Variables
PHP Mailer Variables
The validation process will use all three of these groups to validate, send an email and notify the user of a sent message.
Below the my_contact_form_generate_response() function, write up the following twelve variables:
//response messages
$not_human       = "Human verification incorrect.";
$missing_content = "Please supply all information.";
$email_invalid   = "Email Address Invalid.";
$message_unsent  = "Message was not sent. Try Again.";
$message_sent    = "Thanks! Your message has been sent.";

//user posted variables
$name = $_POST['message_name'];
$email = $_POST['message_email'];
$message = $_POST['message_text'];
$human = $_POST['message_human'];

//php mailer variables
$to = get_option('admin_email');
$subject = "Someone sent a message from ".get_bloginfo('name');
$headers = 'From: '. $email . "rn" .
  'Reply-To: ' . $email . "rn";
Each group is fairly straight forward. The Response Message group stores all our feedback messages in variables.
The User Posted Variables pick up what has been put into the form, and places them in nicely named variables to save having to access the $_POST variable over and over. $_POST contains all information submitted via a form.
Finally, we set up a couple of variables that are required by PHP’s mail() function, which tell it who to go to, a subject line, and some headers that specify from and reply-to addresses.
Validation
This is the meaty bit. We want to check for all possible problems, in the most succinct way possible. This requires several nested if/else conditional statements, but not enough to blow out your brains.
In order, we check for
If the user has submitted the form (using the hidden input)
If not, check the human verification passes (i.e. the user can do math properly!)
If passed, validate the email address
If passed, check for presence of a name and message (as they’re required)
If all the above passes, send an email!
So let’s get stuck into it!
Human verification
This is pretty simple really. We want to test to see if the form user has entered some math correctly, to ensure they are human. If you look back at our form field, you’ll notice the equation is ? + 3 = 5. So obviously, we want to test firstly if the value is NOT 2, spit out an error. If it is 2, we then proceed. Below the variable groups, paste the following.
if(!$human == 0){
  if($human != 2) my_contact_form_generate_response("error", $not_human); //not human!
  else {

    //validate email
    //validate presence of name and message
    //send email
  }
}
else if ($_POST['submitted']) my_contact_form_generate_response("error", $missing_content);
Here, we first check if the human verification is not equal to 0. If it is, then check if it’s incorrect. If so, generate a matching response. The last line checks if the hidden field has been submitted, and if it has, throw another error.
This tests for two cases: empty content and human verification.
If you try submit the form while it’s empty, you should get a nice error message.
Cool! If you enter anything other than “2” into the human verification, you’ll also get an error.
The next part of validation is email validation. Now we know they’re human, we want to be sure they’re supplying a legit reply address you can contact them with.
To do so very easily, we use a PHP function called filter_var() which has a number of validation models. Obviously, we’ll use the FILTER_VALIDATE_EMAIL model to validate email.
Replace the three lines of comments smack bang in the middle of our validation with the following.
//validate email
if(!filter_var($email, FILTER_VALIDATE_EMAIL))
  my_contact_form_generate_response("error", $email_invalid);
else //email is valid
{
  //validate presence of name and message
  //send email
}
Here, we filter the $email variable checking if it’s a valid email address. If not, throw an error. Else, continue!
One line email validation!
Checking for presence of a name and message is relatively easy. We just use PHP’s empty() function, which returns true or false depending whether the variable you pass to it is empty.
//validate presence of name and message
if(empty($name) || empty($message)){
  my_contact_form_generate_response("error", $missing_content);
}
else //ready to go!
{
  //send email
}
Finally, the last piece of our puzzle is sending the email. Once all our validation has passed, we use the mail() function PHP has built in to swiftly send an email. We’ve also got to generate a response on success, and on failure as well.
Believe it or not, you’re done! You’ve now got a fully functional contact form.
If you fill everything out properly, you should get a happy success message that says your email has been sent.
Success!
And that’s it. Rolling your own contact page isn’t hard, and it keeps things as fast as possible without any overhead. Depending on your skills, you can of course build on top of this. It’s a great way to learn new things as well as build on your experience. Let alone know exactly what happens under the hood!
Extra Credit
If you want to take this further, try getting the form to insert each entry as a custom post type post. You’ll need to use nonces, and wp_insert_post(). You can then even turn it into a completely user-driven testimonials engine!